
What’s the first thing that comes to your mind when you hear the word “automation”? You may think it’s a costly venture into the unknown that only developers are cut out for. But it doesn’t always have to be that way. You don’t need to jump immediately at creating a solution for the entire department of 100 people. You can find a small project and automate documentation publishing for a few authors. And Jenkins can help you with that.
What is Jenkins?
Jenkins is an open source automation server that allows you to speed up delivery of a project, for example, a software tool. It’s a nice definition, but what does it mean for an average Tech Writer? What does it have to do with documentation?
To put it simply, Jenkins can help you build your documentation, for example, to HTML5, and copy it to the server where you store it. And the best part is that you can repeat this process over and over again. Imagine that instead of generating the output locally on your machine and then copying it manually to the server each time you change something, you can just click one button and this stuff will happen automatically. Sounds good, doesn’t it?
Why Jenkins?
Why not a different application? The answer is simple. A few jobs back, we got familiar with Jenkins because our dev colleagues were using it to build their applications. After comparing our documentation requirements against the features Jenkins offered, we decided there was no need to reinvent the wheel and plugged documentation building into the existing software delivery process. After some time, we moved to a tech comm company and took Jenkins with us. It did a really good job and we couldn’t leave this guy behind.
Why did we need to automate documentation publishing?
We chose a small project that seemed a good candidate for automation. Although only 5 authors worked on this project, we saw that automation of the documentation delivery process would be beneficial. Connecting remotely to a virtual machine and running Windows batch files didn’t seem the most efficient way to build and publish documentation. Only one person could connect to the remote machine at a particular time, there was no queuing mechanism to handle multiple building processes and no possibility to disable the building process if needed. Generally, we couldn’t centrally control the documentation building process in an efficient way. The scale was small, but it didn’t change the fact that we had a problem. Or let’s call it a challenge. 🙂
Our urge to improve the documentation delivery process was also strengthened by another factor. The help portal that we delivered to the client had been built outside our help authoring tool. We created content in the authoring tool, generated the HTML5 output and then copied it to the web server. The content was styled and formatted on the web server. When we generated the output locally, we could see only some default styles. The real styling was visible only while viewing the content on the target web server. It meant that if we wanted to check our work in terms of styles and formatting, we had to upload it to the web server and view it there. Because we didn’t have a quick and easy way to do it, this task was becoming more and more cumbersome.
How did we automate documentation publishing with Jenkins?
Our current working environment is a completely different story than our previous experience. With no in-house developers and no existing software delivery process to plug into, we had to set up Jenkins from scratch.
We started our micro revolution with assessing what we already had in place. After about 15 minutes, we had a full list of resources – a Windows 7 virtual machine and several batch files to run MadCap Flare builds. That was all. The project scale was small, so the VM was enough to act as the hosting server. The next step was to install Jenkins.
Installation
We used version 1.658, because that was the latest stable version at the time of setting things up.
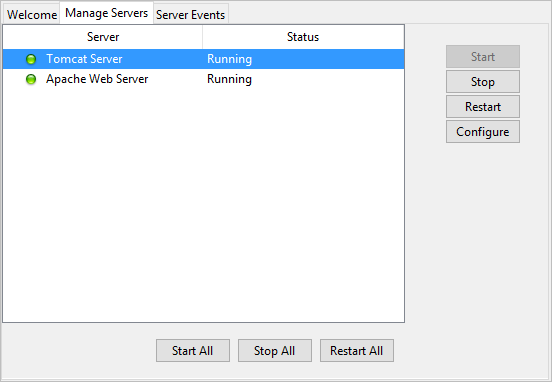
Jenkins is a web application, so it requires an HTTP server to run. To make our setup as easy as possible, we decided to go for the installation package from Bitnami. It’s a simple installer that contains Jenkins, Apache server, and Tomcat server. You even get a small tool (Bitnami Jenkins Stack) to easily access the Jenkins home page and restart the servers.
A word of advice. After Jenkins is installed, to avoid problems with its Windows services, configure them to run using an admin account. It may sound complicated, but It’s a two-minute job. If you need assistance, just ask Google. It’ll know what to do.
Configuration
Ok, we managed to get Jenkins up and running, so now it’s time to configure it.
One bump that we hit on our happy road to document publishing automation were e-mail notifications. We wanted Jenkins to notify us every time our documentation build failed. To do this, we had to configure an e-mail account in the Jenkins settings. We use Office 365, so the task seemed trivial in theory. Just note down all the details from the internet, feed them into Jenkins, save changes, and it’s done. All worked out as planned, except for the “it’s done” part. We were getting some security errors related to handshaking. What was wrong? It turned out that we had to enable the Transport Layer Security (TLS) protocol. We modified Java options in the Jenkins Tomcat properties, and we were back on track.
After solving the notifications problem, we moved to other settings. Jenkins offers lots of different options, so we suggest taking care of some of the global settings first.
Number of concurrent builds
This setting defines how many building processes can run at the same time. Keep this number at a reasonable level, not to overload the building server. It’s especially important in case of a low-budget server that doesn’t offer outstanding performance. If you start more processes than defined by this parameter, Jenkins will queue them for execution.

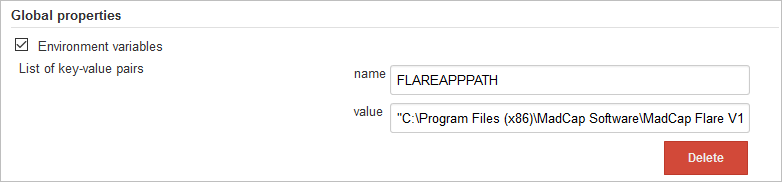
Environment variables
To make your life easier, you can add custom variables for things that can be reused in different parts of Jenkins. A good candidate for a variable would be a path to an application, for example, to your help authoring tool.
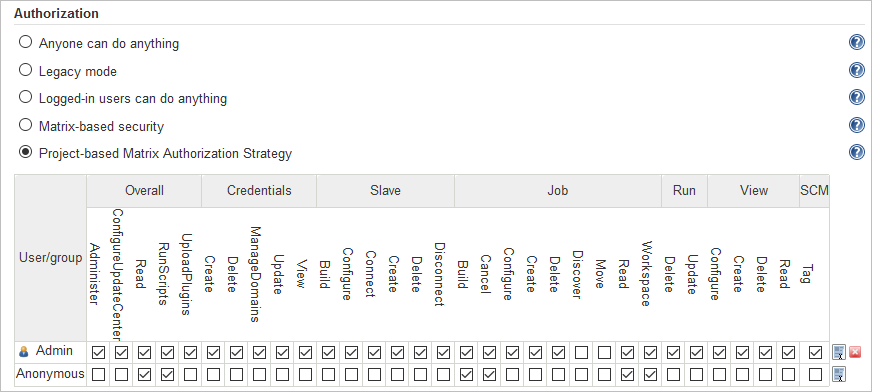
Access rights
Depending on your security policy, you may need to limit what certain users can do and to leave full control to the administrator. One of the options is to let everyone start the building process and see the log entries, but to allow only admins to change the system configuration. Jenkins has quite a robust set of permissions that you can adjust.
Want to find out more?
Extras
After you’re done with the main configuration, you may want to add some bells and whistles to your setup. You can install many free plugins to extend the functionality of Jenkins. You can do it directly from the Jenkins settings. Some plugins don’t even require a system restart. We found the following plugins useful in our setup:
- Email Extension Plugin – for customising email notifications sent from Jenkins
- ThinBackup – for creating scheduled or on-demand backups of the Jenkins configuration
- Build Trigger Badge Plugin – for displaying icons in the build history that identify whether the build was triggered manually by a user or automatically according to the schedule
Jobs for building documents
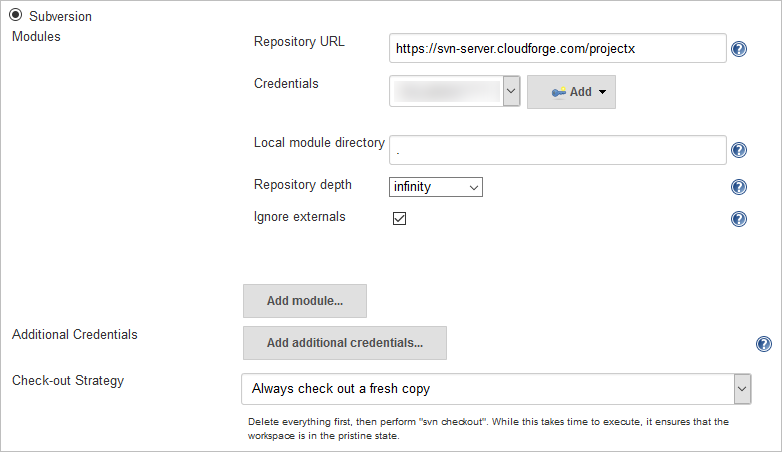
Jenkins is configured and ready to do some documentation building. Now, we need to create jobs that will make it happen. In Jenkins, jobs are tasks that can do different things for you. For example, you can set up a job to check out files from an SVN repository, execute a Windows batch command to build a MadCap Flare project to HTML5 and then copy the output to the server.
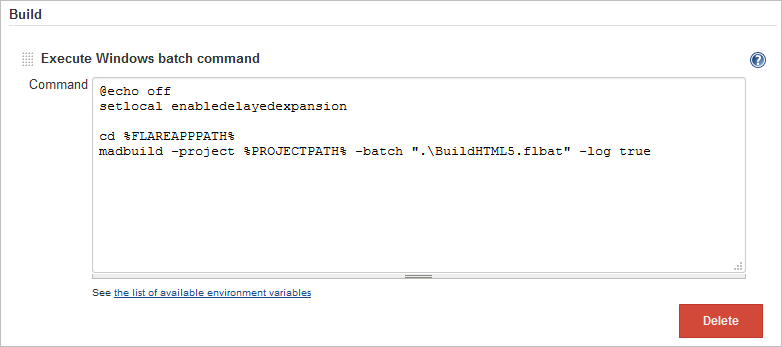
MadCap Flare is just an example. You can couple Jenkins with any documentation tool that supports building output from the command-line interface (CLI), like static site generators and API documentation generators. If you prefer not to use Windows batch commands, you can install plugins for scripting languages, like Python.
You can also configure a job to perform a post-build action after the main building steps finish. For example, you can tell Jenkins to send you an email notification with the log attached to it each time the job doesn’t complete successfully.

The email notification shown above is available only if you install the Email Extension Plugin mentioned earlier. If you don’t install this plugin, you can only set up a default email notification that offers a very limited set of options.
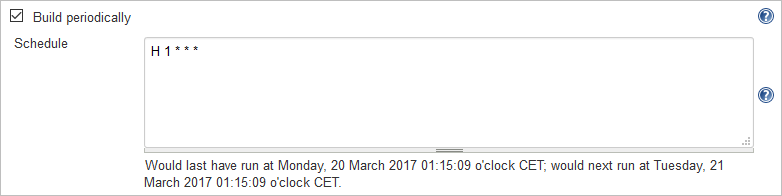
You can start jobs manually or schedule them to start automatically. For example, you can set up a job to start every day between 1 and 2 am.
Once you add your jobs and make sure they do what you expect, you can share the good news with the rest of your team. The documentation building process has been automated and it’s ready to rock 😉
Jenkins: did the effort pay off?
In our case, it definitely did. First of all, we managed to tackle the challenges of the project for which Jenkins was set up. Second of all, we built a platform that we can extend with a new configuration in the future. And last but not least, we acquired precious know-how that we can reuse in other projects.
The solution presented in this article is just one of the ways to automate documentation publishing with Jenkins. If you know other recipes that worked out well, let us know.
Check also our other articles, e.g. about company intranet solution or MadCap Flare reports.
Related articles

MadCap Flare: managing your project and content
Learn some of our best practices for managing your project in Flare

MadCap Flare tips and tricks
Find out how to customize your MadCap Flare workspace to suit your needs

How to ensure your technical documentation works
One of our team explains how you can ensure your documentation works